


If you’ve just taken over packaging at your company, you’re probably asking:
Where do I even start? What does a good artwork workflow look like? How can I avoid errors and build a system that scales as we grow?
This guide is designed exactly for that moment.
Whether you're inheriting a chaotic mess or a halfway decent system, the first 90 days are your best shot at shaping how your packaging team (and everyone they collaborate with) works. This playbook walks you through exactly what to focus on in your first 30, 60, and 90 days so you can build a reliable, repeatable, and scalable artwork management process.
First 30 days: Understand the landscape
Your goal here is to observe, audit, and learn. You're not here to fix things just yet, but understand how things currently work, where the friction lies, and who touches what.
1. Map the existing artwork workflow
Ask yourself:
- Who initiates artwork projects?
- What tools are used to brief, review, and approve packaging designs?
- Where are files stored? Are they versioned?
- How are final files handed off to printers or suppliers?

Most teams use a mix of email, spreadsheets, shared drives, and maybe a design platform like Adobe Illustrator. But what’s often missing is a central system that ties it all together.
This is where tools like Artwork Flow can help bring visibility, structure, and version control to your packaging lifecycle without adding more complexity.
2. Audit recent artwork projects
Review 3 to 5 recent artwork projects, especially those that involved multiple rounds of feedback or tight deadlines. Ask:
- How many packaging revisions did they go through?
- Where did delays happen?
- Were there any artwork compliance issues or errors caught late?
You’ll start spotting patterns like missing briefs, overlapping feedback, or unclear ownership.
3. Talk to key stakeholders
Talk to teams involved in the packaging lifecycle, like:
- Marketing or Brand (they own the brief)
- Legal/Regulatory (they review content)
- Design (in-house or agency)
- R&D/Product (they give technical specs)
- QA or Packaging Engineering (they check for manufacturability)
- Vendors or printers (they work with final files)
Ask each stakeholder:
- What frustrates you most about the current process?
- Where do mistakes usually happen?
- What do you wish was easier or faster?
These insights will help you build a packaging workflow that people actually want to use.
Days 30–60: Design your ideal artwork workflow
Now that you understand how things work and where they break, you’re ready to start building the system that your team can scale with.
Step 1: Define your core workflow stages
A scalable packaging workflow typically includes the following stages:
- Briefing: What are we creating? What are the specs, claims, SKU details, and deadlines?
- Design & development: Where first drafts and versions are created.
- Internal review: Usually by marketing or product teams.
- Regulatory & legal review: Critical for label compliance.
- Artwork finalization: Final tweaks, mechanicals, die-line adjustments.
- Prepress & printer handoff: Files are released for production.
Write this down. Better yet, make a visual flowchart.
.png)
Pro Tip: Assign owners and deadlines to each stage. If everything’s everyone’s job, it won’t get done.
Step 2: Create standardized templates
Templates reduce confusion and keep everyone aligned.
Some must-haves:
- A creative brief template: Include fields for SKU, claims, dimensions, regulatory constraints, and assets needed.
- A compliance checklist: Tailored to your industry’s packaging requirements (FDA, FSSAI, EU labeling laws, etc.).
- A reviewer matrix: Defines who must sign off on what (and in which order).
This makes the process repeatable, even as your team grows or changes.
Step 3: Identify gaps in your tool stack
At this point, you’ll notice where tools fall short. You might find:
- Files are scattered across email, Google Drive, and desktops
- There’s no version control
- Feedback is hard to track
- Regulatory checks happen too late
Consider introducing:
- An artwork management system that centralizes briefs, versions, and approvals
- Proofing tools that let you annotate files and compare revisions side by side
- Compliance checkers that verify mandatory elements (like ingredient declarations, barcode placement, or warning statements)
If you’re looking to consolidate briefs, artwork, feedback, and approvals into a single system, Artwork Flow can help you simplify the process while staying compliant and on schedule.

Day 60–90: Test small improvements and strengthen what works
You’ve done the research, built a framework, and spotted gaps. Now it’s time to start improving your current process by testing small changes and building on what already works, not by overhauling everything.
1. Try small tweaks on an upcoming project
Pick a packaging project that’s already in the pipeline like a label refresh, a format change, or a new SKU.
Rather than changing the entire system, try introducing one or two new elements:
- Use your new checklist or brief template
- Assign clearer roles for feedback or review
- Try a proofing or version control tool, if needed
Document everything such as how long it takes, what works well, and what breaks.
2. Collect feedback and refine
As the project moves forward, take note:
- Did the tweaks help?
- Was there less back and forth?
- Did timelines improve?
Even if you’re not making sweeping changes, these small wins can add up and help build confidence in a new process over time.
3. Share what’s working and keep it optional
If something you tried worked well, share it with the team. But don’t force adoption right away.
You could:
- Host a short team sync to walk through a better version of the process
- Offer templates or checklists for others to try
- Keep iterating based on what people actually use
This way, you’re not pushing a new system but making the existing one easier to use.
Beyond 90 days: Optimize gradually
A scalable artwork process isn’t built overnight. But by day 90, you’ll ideally have:
- A clearer understanding of how things work
- Some early wins from lightweight changes
- A set of tools or templates you can use again
- A better sense of what your team actually needs and what’s worth changing
From here, you can keep evolving:
- Can you speed up reviews with simple automations?
- Can you improve briefs to reduce confusion?
- Can you add structure without slowing things down?
With tools like Artwork Flow, you don’t have to rip and replace your entire workflow. You can build on what’s already in place and track how your changes are helping, step by step.

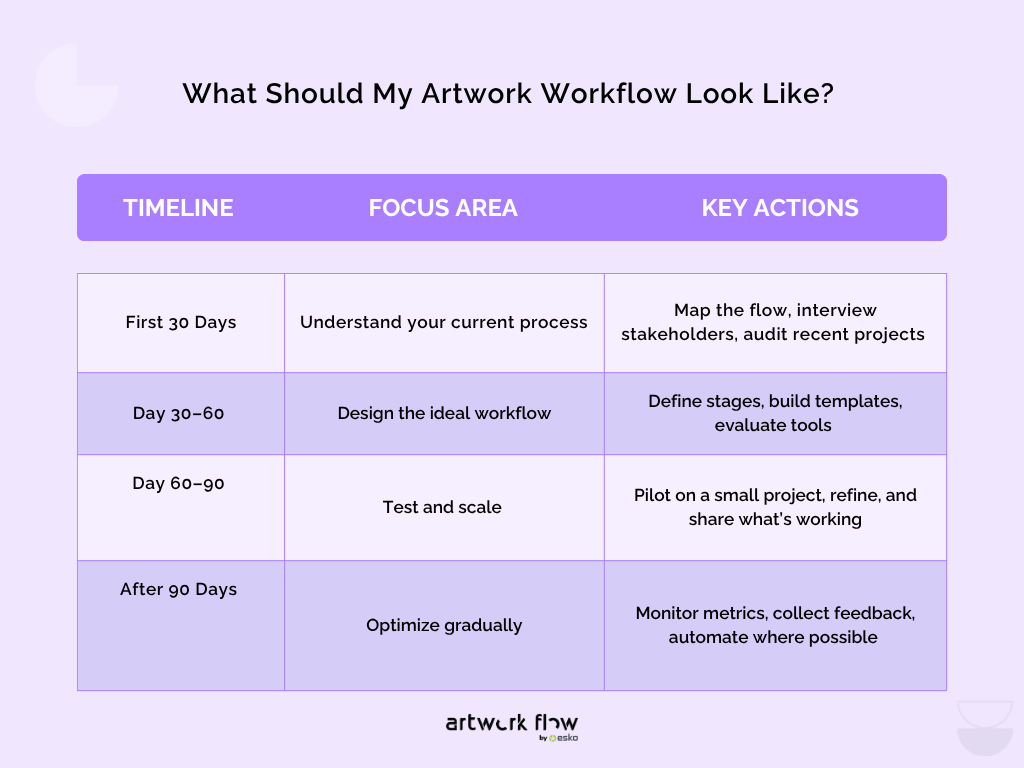
What should my artwork workflow look like?
If you're taking over packaging at your company, here's your 90-day plan:
Final thoughts
When packaging errors happen, it’s rarely because people don’t care. As a new packaging manager, your biggest value is not managing individual projects. It’s designing a system that makes the right thing the easiest thing to do.
Whether you’re fixing a messy workflow or fine-tuning a decent process, this guide is about helping you lead with clarity.
And if you ever decide you need a tool to bring your briefs, feedback, versions, and approvals together in one place, Artwork Flow is built to support you. Book a demo when you're ready.


_2.jpg)


